Image color change online editor [ transparent , fill , replace ]
The PC version frequently executes color conversion processing.
Therefore, operation may be slow depending on the machine specifications and image condition.
In such cases, please try the SP version.
Therefore, operation may be slow depending on the machine specifications and image condition.
In such cases, please try the SP version.


Mode
Color to be replaced
| (a)Choose with cursor | (b)Coordinate |

OFF
|
x :
y :
|
| (c)Pick color |
| (d)Opacity |
255
|
| (e)Range |
%
|
Fill position
| (a)Choose with cursor | (b)Coordinate |

OFF
|
x :
y :
|
| (e)Range | % |
Color after replacement
| (f)Choose with cursor | (g)Coordinate |
|
OFF
|
x :
y :
|
| (h)Pick color |
| (i)Opacity |
255
|
Execute Conv
| [1]Before pixels: 0 | [2]After | ||
|
|
|||
|
Drop your image file here!
|
|
||
This page performs image conversion on the user's PC, so once the page is loaded, it can be used without an Internet connection.
However, if you feel that the behavior is strange, please reload the page again.
However, if you feel that the behavior is strange, please reload the page again.
History box
*You can stock up to 10 images. Double-click the image to delete it.
*You can download the image selected in the history box.
This tools can perform color conversion of images using the following two conversion methods.
- Choose a specific color for the entire image and replace it all at once.
- Filling the area with color.
You can also adjust the transparency and perform transparency processing.
*Since color conversion is performed by specifying RGB/HEX values for each pixel, it is not suitable for complex photographic images containing a wide variety of colors, such as those taken with a camera.
Please use it when editing illustration images or banners that are expressed with few colors.( Adjusting [ (c)(e)Range ] may help to some extent. )
Manual
- Controller From above the image( [1]Before ) "Replace entire"
- Controller Color picker "Common to both modes"
- Controller "Fill area"
- Image display, Navigation "Common to both modes"
- History box "Common to both modes"
- Contact developer
Controller From above the image( [1]Before ) "Replace entire"
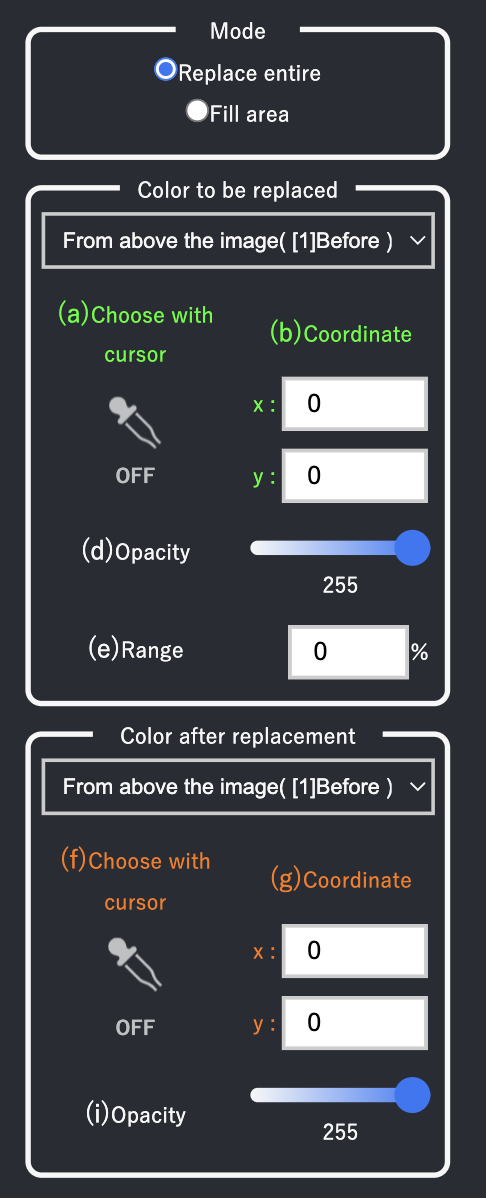
| Mode | Switch between the two functions: Replace entire, Fill area. | |
|---|---|---|
| Color to be replaced | From above the image( [1]Before ) |
Pull-down menu. You can change the method of specifying the replacement target color from coordinate specification to color picker specification. |
| (a)Choose with cursor |
If you move the mouse cursor over the image( [1]Before ) while it is turned on, you can choose the color to be replaced. |
|
| (b)Coordinate | You can extract the replacement target color from the image( [1]Before ) by specifying the coordinates numerically. | |
| (d)Opacity | (e)Range does not affect (d)Opacity, so it is safe to not perform any basic operations. | |
| (e)Range | If this value is 0%, color conversion will not be performed unless the color to be replaced completely matches the color (RGBA) existing in the image before conversion.
By increasing this value, colors close to the chose color will also be replaced. (d)Opacity is not affected. |
|
| Color after replacement | From above the image( [1]Before ) |
Pull-down menu. You can change the method of specifying the color after replacement from coordinate specification to color picker specification. |
| (f)Choose with cursor | If you move the mouse cursor over the image( [1]Before ) while it is turned on, you can choose the replaced color. | |
| (g)Coordinate | You can extract the replaced color from the image( [1]Before ) by specifying the coordinates numerically. | |
| (i)Opacity | The transparency of the replaced color can be changed. | |
Controller Color picker "Common to both modes"
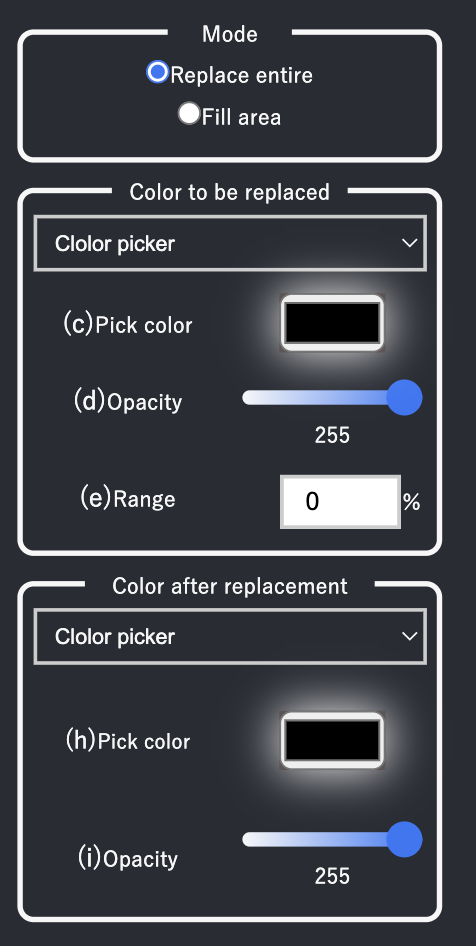
| Mode | Switch between the two functions: Replace entire, Fill area. | |
|---|---|---|
| Color to be replaced *Not in mode "Fill area" |
Color picker |
Pull-down menu. You can change the method of specifying the replacement target color from color picker specification to coordinate specification. |
| (c)Pick color | You can use the color picker to choose a replacement color. If (e)Range is 0%, color conversion will not be performed unless RGBA completely matches, so we recommend using (a)Choose with cursor. |
|
| (d)Opacity | (e)Range does not affect (d)Opacity, so it is safe to not perform any basic operations. | |
| (e)Range | If this value is 0%, color conversion will not be performed unless the color to be replaced completely matches the color (RGBA) existing in the image before conversion.
By increasing this value, colors close to the chose color will also be replaced. (d)Opacity is not affected. |
|
| Color after replacement | Color picker |
Pull-down menu. You can change the method of specifying the color after replacement from color picker specification to coordinate specification. |
| (h)Pick color | You can choose the replacement color using the color picker. | |
| (i)Opacity | The transparency of the replaced color can be changed. | |
Controller "Fill area"
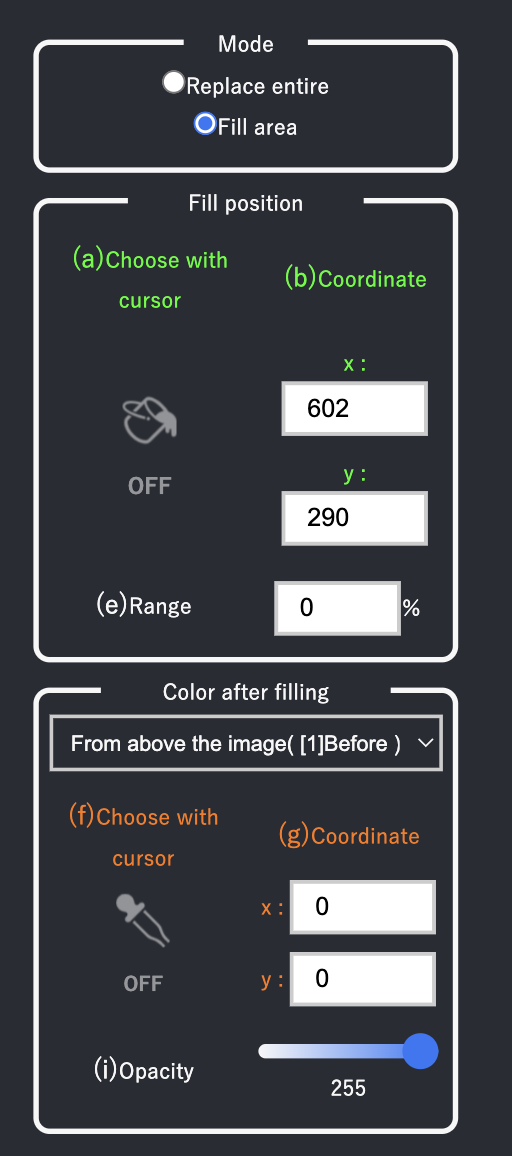
| Mode | Switch between the two functions: Replace entire, Fill area. | |
|---|---|---|
| Fill position | (a)Choose with cursor | When turned on, move the mouse cursor over the image( [1]Before ) to select the fill start position. |
| (b)Coordinate | You can select the fill start position on the image( [1]Before ) by specifying the coordinates numerically. | |
| (e)Range | If this value is 0%, it is determined that the area is within the area only if the color exactly matches the color of the fill start position.
By increasing this value, colors close to the selected color are also determined to be within the area. |
|
| Color after filling | From above the image( [1]Before ) |
Pull-down menu. You can change the method of specifying the color after filling from coordinate specification to color picker specification. |
| (f)Choose with cursor | If you move the mouse cursor over the image( [1]Before ) while it is turned on, you can choose the color after filling. | |
| (g)Coordinate | You can extract the filled color from the image by specifying the coordinates numerically. | |
| (i)Opacity | You can change the transparency of the color after filling. | |
Image display, Navigation "Common to both modes"
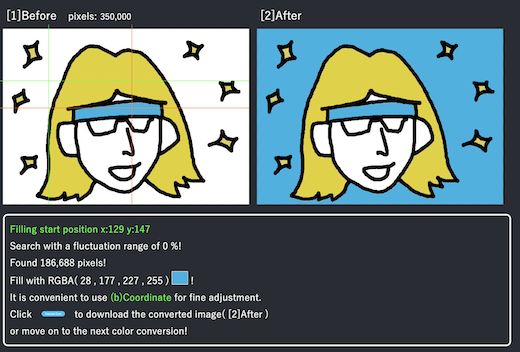
| [1]Before |
Image before conversion. Coordinates are specified from this image. You can download the images displayed here. |
|---|---|
| [2]After |
Displays the image when color conversion is performed. If you perform the next color conversion without updating with the "Execute Conv" button, the color will revert to the original state. |
| Navigation | Displays the currently specified coordinate position, RGBA values before and after conversion, hints for the next operation, etc. |
History box "Common to both modes"

| History box |
The currently selected image (inside the thick green frame) will be displayed [1]Before. The selected image (inside the thick green frame) can be downloaded from the download button. You can save up to 10 images in the history box. If there are more than 10 images, the oldest images will be automatically deleted. Double-click the image to delete it. |
|---|
Contact developer
Please DM from X.If you follow us, it will be easier for you to notice our DMs.


